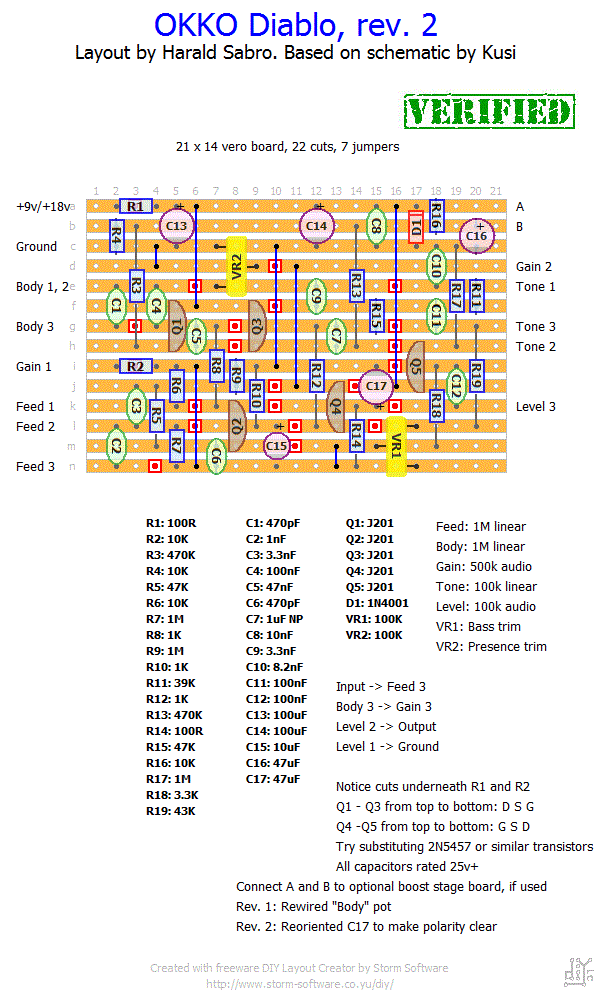
As requested here’s the a vero layout for the OKKO Diablo Boost+ based on a schematic drawn by Kusi. I chose to divide the effect into two separate vero boards. If you only want to build the OKKO Diablo there’s a vero layout for that effect, but if you also want to build the Boost+ extension there’s a separate boost stage vero layout.
If you decide to build the full Diablo Boost+ effect wire the output of the main board to a second DPDT/3PDT switch that either bypasses or engages the Boost+ stage. Remember to also connect the A and B points on the main board and boost stage board together.
I just like to add I haven’t actually built this, so as of now it’s still unverified.
I have posted a schem of how the GainPlus Pot works on Freestompboxes.
Very cool, Andre. Did you make a schematic? I wouldn’t necessarily assume the old schematic is wrong; it could be that the effect has evolved over the years. But it would be very interesting to see all the details. Maybe post it at freestompboxes?
I’ve just dissected an original Okko Diablo Plus.
We’ve all got the Boost part completely wrong. The Gain Plus Pot is simply an A500K in series with the Gain Pot and it gets jumpered by the + switch when it is off. Also Pins 1 on the Vol Pot and the Gain Pot (through the Gain Plus pot) run to +9 Volts and not to ground.
I fairly certain you want to wire this up as a main circuit with an add-on at the end as per this wiring layout: https://sabro.no/sabrotone/?attachment_id=3472
Yes indeed. That’s your circuit input. Put in a different way it means circuit input from your 3PDT goes both to the feed pot and the circuit board.
Hi Harald….me again….sorry for so many basic questions.
in ref to my (dale) last note. I guess I am asking what does ‘Input->Feed3’ mean?
I wired this up and nothing works unless both channels are on. Can you have boost with the distortion off? I think I am almost their but UGH!!
dale
Hi Harald.
I am doing the diablo+boost and got your previous link/message. I want to confirm something. On the main board ‘n-1’ goes to ‘feed 3’. On the same layout at the bottom it says ‘Input ->Feed 3’. Does ‘Input’ refer to the main board 3pdt switch, lug 2? thus becoming the input link to/from the main board?
Thanks Harald.
Dale, here’s my recommendation on wiring the Diablo: https://sabro.no/sabrotone/?attachment_id=3472
Hi Harald.
I have successfully put 2 effects circuits in one box several times. When I put the diablo boost in with the distortion do I simply treat them as 2 effects pcb’s?
i.e. Wire each to it’s own 3pdt and connect; out to in etc..?
dale
p.s.
I just finished the Pinnacle and Paisley in one 1590B with paisley artwork and it’s Greeeaaattt. I called it ‘Paisley Pennacle’. Thanks for all your work!!
You got it. The 78L15 will give you (as long as you feed it the proper voltage) +15V regulated DC, whereas the 78L05 will only give you +5V. Quite the difference. But there are a number of different +15V regulators out there, and as long as you can get it in a usable package and you make sure to watch the pinout any of them should work fine.
Harald….or anyone who knows;
will a 78L05 100ma volt reg work instead of a 78L15?
dale…….
uhoh…I bet the 05/15 is a voltage limit….correct?
Hi Kurtis. It’s not my schematic so I won’t post it here, but I’ll be happy to point you in the right direction. I based my layout on a schematic from this thread over at FSB: http://www.freestompboxes.org/viewtopic.php?f=7&t=1482
I was hoping to make an Okko diablo gain plus as an electronics project for school. I would make my own circuit board. Could you please provide the schematic in which these diagrams where made from. I need to develop my own circuit layout since we etch our own.
Please and Thank You
I’m sorry to disappoint, alex, but I can’t give you any voltages as I’ve never built this circuit myself. But maybe someone who has can come to your rescue?
It is the second time I do, and this time it sounds better. But tone is very drastic.
All pots work, but it sounds very bass or treble.
You can give me some voltages to arrive before the error. I’m desperate.
It will be the fault of the transistors? J201.
Alex, I recommend the “debugging” section for a start. Hopefully you can solve it.
Hello,I have not worked the pedal. And I have reviewed and are correct.
Sounds great bass with very little volume.
it can be?
I haven’t tried Facebook so far. Is there any good reason to be on there?
Thanks a lot dear Harald!
I’m going to solder and i’ll review thi effect!
Ehi Harald…have you got a Facebook account?
😉
Thanks again!
GX, it doesn’t really matter which direction you put the trimmers. They may or may not work “opposite” to what you’d normally see if it was panel mounted, but since you’re just setting them once and hiding them inside the effect it doesn’t matter. If you were to expose them as user adjustable controls then that’s a whole different story.
Here the link of my trimmers…
http://www.musikding.de/images/product_images/popup_images/at93ya.png
Sorry Harald, about the trimmers:
why the VR1 has the central pin on right and VR2 to the left?
Have the trimmers a polarity?
I have these ones: http://www.musikding.de/Passive-parts/Potentiometers/Precision-Trimpot/Precision-Trimpot-100k::1244.html
…how can i understand if the position is right?
Thanks a lot!
Hi Peter,
besides Harald’s great suggestions to reduce noise and feedback which can be introduced into the circuit, another effective and systemic strategy is to replace the 470K resistor labeled R13 (providing Uref to the gate of Q3) with a Multiturn-trimpot or a good Trimpot. Now you can adjust the Trimpot exactly (even though this will be a quite narrow range of settings, but still good to locate) until you don’t hear any noise , nasty hiss or feedback from the circuit, and even not if you dial all controls to maximum or unpug the jack from the guitar while the effect is turned on! This alternative should work quite well and you may then replace the trimpot with a fixed resistor with an equal value to the adjusted one. This should eliminate feedback noise problems regardless from your art of wiring 🙂 Rock On Harald!
Built Okko Diablo a month ago and it is by far the best dirt pedal I have made. Very versatile for different amps and guitars humbucker or single coil and has a wide range of gain from mild OD to Marshall like distortion. Best thing is the note clarity not muddy with chords. Highly recommend.
Build it and felt in Love to it.
Wherever I go, this FX is with me.
THNX for the Layout and for the help, building it.
Hi Peter.
This is a general problem with all high and very high gain effects. What you’re hearing is feedback where an output signal is allowed to leak back into the circuit typically because two wires are closer than they should be. There are lots of things that can be done to prevent this, but typically you want to keep wire runs short, keep input and output wires as far away from each other as possible, if wires need to cross try to do so at 90 degree angles, and you may also have to use shielded wire for the input and output wires.
Good luck 🙂
Hi
thank you very much for your efforts. for me as an novice it is pretty much easier to built from your layouts. I lately built your ReboteDelay and it works like a charm.
I also built the diablo without boost+ and it works great. one thing however: if I turn the gain pot up above 7 or 8 of 10 theres a loud whistle like a feedback. even without an input signal. has anyone experienced the same or can tell me what could be wrong?
I’m not very familiar with electronics so a failure diagnostic would be a nightmare.
thank you all for your contributions
Nickolas. Have a look the “schematics & drawings” page. I suggest something like the “main circuit with addon” wiring.
Hi Harald
Finally build it, and I really LOVE IT !!!!!!
Thanks for publishing.
Do you by any chance know how to connect leds at main and boost + stage for to know when the pedal is activated or not.
Thank you in advance .
Bud. Yes, you can eliminate either level pot by taking the output signal where you’d normally connect “Level 3”, but to retain the original circuit functionality I’d add a 100k resistor to ground as well. You might also get slightly different results based on which one of the two level pots you choose to remove, but you’ll have to experiment and see what you prefer.
Hi, my main board works, but i’m not happy with the Level , so i’d build the boost stage without adding swith, straight main to boost, i don’t want another pot “boost” so can i plug boost outpu t on level 3 ? thx alot!
my config, main output > boost input rather than level3, boost output to level 3..
some help needed , thx
Hi, Bud. I’m not entirely sure what your problem is, but you might want to grab the schematic in the relevant thread over at http://www.freestompboxes.org. You need to connect the circuit input from the 3PDT to lug #3 on the “Feed” pot and then daisy-chain it from there to the “Feed 3” label on the circuit board.
Hi,
i’d build this circuit, it doesn’t work, input > feed 3 , only a capacitor?
input doesn’t feed a fet?
can someone who did this board help a lil bit? i got no input .
Hi, Mirko. You’re welcome 🙂
Hello Mat, Okko is my first building and it works wonderful! I am totally blown away from the sound!
Thanks for your great work! Best regards, Mirko
Hi, Dichteros. No, not as far as “non-polar” goes. You need to either use a non-polar/bi-polar electrolytic or you can use a regular capacitor (which are all non-polar). I don’t know the inner workings of this circuit that well, and you may or may not get away with using a regular 1uF electrolytic. Another option could be to lower the value somewhat if you have a regular capacitor of 470nF, 680nF or something like that lying around, but this may alter the sound of the unit for better or for worse.
Can i Use a 1uF Tantal for C7?
NP means non-polar, i.e. a special electrolytic capacitor that can be oriented either way. I believe the regular capacitors historically used to be too large or too expensive in this size, and it was a lot more practical to use electrolytics. Provided you can find a 1uF regular capacitor that can fit the board this is a perfectly good, and maybe even better, substitute.
Great job! Just a noob question… I see C7 is 1uF NP… What is NP ?
Thanks.
Thanks Harald I will try this way as soon as i get my Jfets,I bought some on ebay and expect them from day to day.
….I mean how can I bias Jfets J210?? can anyone help?
The schematic doesn’t specify how the stock unit is configured. My best suggestion is to start with all trim pots at halfway, then adjust to taste. Or if it really matters you can try to get hold of someone with an original unit and ask them to open it and note the position of all trimmers, but you’re not guaranteed they’re all set the same way even in the originals.
I was referring at the resistance R5 at http://www.sabrodesign.com/wp-content/uploads/2011/01/OkkoDiabloBoost.gif
schematic but I made a mistake because the resistance is grounded anyway with jumpers.
How can I find the exact position of VR1,VR2,VR3 at the boost stage and VR1,VR2 at the main stage?http://www.sabrodesign.com/wp-content/uploads/2011/01/OkkoDiablo.gif
Can you clarify what you mean by R5 being connected to 6g-6k and not 6g-6h? What schematic are you referring to?
Hi everyone
MAT,CHRIS have you notice according OKKO DIABLO+ SCHEMATIC REV1.2 that R5 is connected to 6g-6k and not 6g-6h? I am in the process of building this pedal,does anybody knows how can I trim VR1,VR2,VR3?
Breadboarded the boost add-on tonight according to the schematic and it produced a considerate boost. I also double- and triple checked the boost vero layout and it also looks correct. I don’t see why the boost add-on shouldn’t work.
Hi Harald,
you are awesome!!! I built the Diablo last night and it sounds so cool! Thanks a lot for drawing the vero and sharing it! I also built the Boost but had the same results as Mat, when engaged it had less volume than bypassed or with only the diablo engaged.
I tried several J201s and trimmed Q1 to 4,5 V, whatever I tried I couldn’t get Q2 below 9 volts. Has anybody an idea?
Thanks a lot
Cheers
Chris
Thanks for the input, Mat. I had to breadboard the first section of this effect after having read this.
There’s a few things to keep in mind here. First, I’m used to numbering my pots with the wiper being #2, yet the schematic has the wiper specifically numbered 3. I chose to ignore the numbering rather than schematic symbol on the original schematic, meaning the “Body” pot connects to “Gain” #3 where “Gain” is set up as a variable voltage divider with output at the wiper/#2.
Second, as you said, I’m not sure whether the “Body” pot is supposed to be a mid boost or a mid cut. I found a user manual at the Okko website describing it as “[turn it to the] right for a fatter, singing sound”, so I guess that settles it as a mid boost.
Having breadboarded the first part of the circuit it seems to be working fine except the “Body” pot functions like a mid cut. I’ll update the layout to use lugs 2 and 3 instead of 1 and 2 as it is now. That should do it.
I completely forgot to mention something important, and I only remembered now because I was cleaning up the wiring in my Diablo build. The BODY control will not work the way its wired on your layout, however even wiring it exactly like the schematic posted on FSB doesn’t work. It’s an easy fix though.
It’s difficult to determine if this is how it should be wired without seeing a gut shot that shows the BODY control, but this is how I wired it so that it functions like a mid control (as it should):
-“GAIN2” should go to GAIN lug 3 as per schematic
-BODY lug 3 is wired to “BODY 2,3” on your layout
-BODY lug 3 then is wired to GAIN lug 2 as per schematic
-BODY lug 2 is wired to “BODY1” on your layout
-BODY lug 1 is left N.C.
When wired this way, the BODY control acts as a mid boost. Going from minimal mids at CCW to maximum mods at CW. I’m not sure if this is how the actual pedal works though, it could very well act as a mid CUT, and then all you would have to do is reverse the BODY wiring.
Hope I explained this properly, sorry I didn’t note this before.
This has quickly become one of my favourite overdrive effects lately. Sure it can be slightly noisy at its highest settings (no more than any distortion effect), but the tweakability (that’s not a word) is incredible.
Also, don’t think you can sub-in a 1M pot for the gain control and squeeze more gain out of it. It’ll pretty much turn into a noise gate when maxed with the body control. The more you know 😉
I’ll see if I can draw this to clarify it.
I think I’m gonna build it, I’ve just seen this ( http://www.youtube.com/watch?v=lbX-E8wY8EA&feature=related ) and it’s really really great!
Btw I still have to understand clearly how to connect the 2 stages (especially for the boost 3pdt!)
Stock unit has metal film
Oops. Will add this to the layout.
I think 5% would be fine. Pretty sure the stock units have 1% metal film though.
Level pot is 100k log.
Emm..May i know the value for Level pot?
To be honest I don’t know much about this effect. Personally I’d be happy enough with 5% carbon resistors, but you’ll have to judge for yourself. Maybe you can find some gut shots of the original pedal on the web and determine what type of resistors it uses?
Should i use 1% or 5% resistor for this build? Scared that it need tighter tolerances to properly bias those jfets..
Can anyone chime in..
You’re very much welcome. Let us know how it compares if you decide to build it.
Definitely modified for the better. I always found the BSIAB(2) to be kind of bland sounding.
yes it’s the other way around like my diablo pedal,
this is a modified BSIAB and i think its the best there is.
the tone control is a BMP tone control.
again thanks harald, when i have time i will build this one and compare it to my pedal.
Mat, I had a quick look at youtube and found this video suggesting the tone pot should indeed be wired the other way around. Updated the layout.
I tried several different fets without success. I hope someone decides to build one and prove me wrong 🙂 For now I’m enjoying the base Diablo.
I’m actually quite surprised with how many different sounds you can get out of this thing. A lot of it has to do with the FEED control. This pedal can go from a brillant chimey boosted clean (on a Les Paul none-the-less!) all the way to brown sound territory.
Thanks for the layout Harald (and Chris for requesting it 😀 )
I’d feel more comfortable with Bass CCW and Treble CW too, but I have no way of verifying what the correct orientation of the pot should be. I’ll leave the layout as-is for now.
About the Boost+ section, did you try different FETs? From my, albeit limited, experience I’ve found J201s to give a lot more gain than e.g. 2N5457.
Happy to hear the Diablo portion works at least 🙂
Thanks, and thanks for letting me know. I’ll update as soon as I find the time.
Just built this one and the regular “Diablo” layout is verified. The only thing is that the Tone knob rolls from Treble (CCW) to Bass (CW), I’m not sure if that’s how the actual Diablo is, but I just swapped the connections to what I’m comfortable with 😉
I built the Boost+ portion as well, however when engaged, it’s slightly under unity gain at its maximum setting. I quickly checked your layout with the schematic, as well as my soldering job, and all seems to check out okay. Not quite sure whats wrong, but realistically the Boost portion is unnecessary for my uses as the regular build has more than enough gain and volume.
I did work up a layout for a charge pump, similar to what the stock unit incorporates. The Diablo definitely benefits from the ~18v (as long as your capacitors can handle it).
First i have to say your are doing great work and thanks for publishing and contributing your time!
also,
I have an original Okko and this pedal love to get a 18v instead of the standard 9v, so you can write it in the vero file and recommend a 25v + capacitors.
Thanks again.