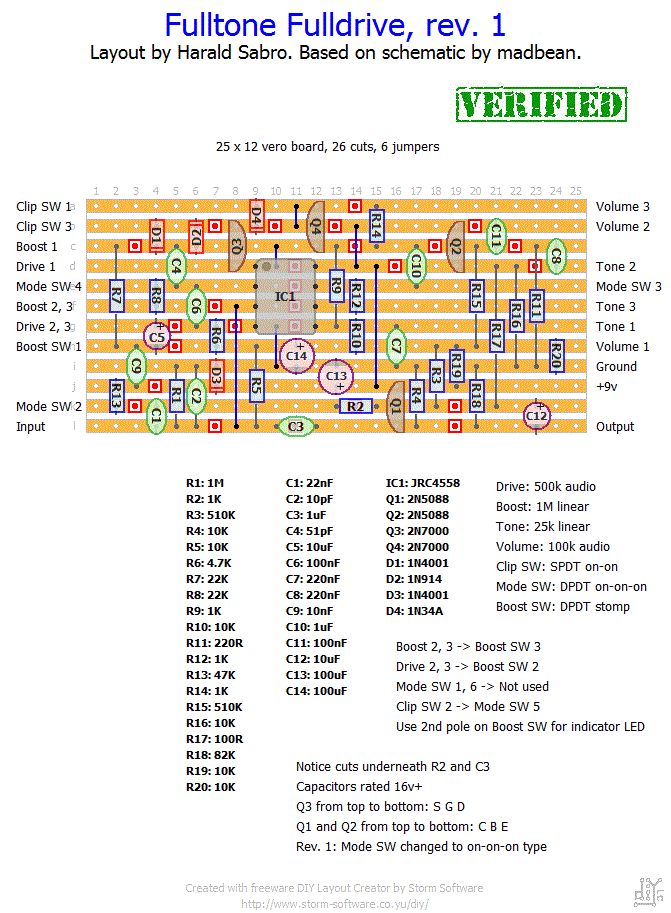
Here’s a vero layout for the Fulldrive based on a schematic by madbean. Yet to be verified. Let me know if you get this thing working.
Update (08.07.2011): This is now verified. Thanks to Glenn.
Update (05.08.2011): Mode switch changed to an on-on-on type. Thanks to Danny.


Ed, the order doesn’t usually matter as long as there’s an electrical connection. In this case you should be fine either way.
Question on the switch wiring
Does the lead from the circuit board boost 2,3 go to the Boost SW3 and then to pins 2,3 on the boost pot, or does the order not matter. Same question on the drive 2,3 from board to pot, pot to switch or the other way around
Trying hard to debug
Thanks
Ed
Hi Ed.
Check out the debug section and start with a visual inspection.
Hi Harald
Just finished this one.
First try just getting so broken up sputtering distortions
Vol seems to work fine
Tone seems to have no effect
Drive is working only small changes
Boost seems to add a bit of gain
Any suggestions as to where I should start the debug
Thanks
Appreciate the clarification, DIYfuzz! I’m sure this will be useful information for future builders 🙂
Hi Harald,
I finished building the Fulldrive a couple days ago and I’m very happy with it! Thank you!
But there are some details I have to write about.
According to madbean’s schematic the center position of the on-on-on switch is not to disconnect both sections (i.e. connect the unused lugs; 1-2 and 5-6); on the contrary, it is used to connect both sides (the “Flat Mids” mode adds a 10n/47k combination in parallel with the tone control to flatten out the inherent midrange emphasis, the “Comp Cut” mode removes the clipping diodes altogether for a large volume boost, the “Vintage” mode is normal silicon/mosfet clipping in the feedback loop of the opamp). This is how I made it and it works perfect! Of course, you have to be careful, because there are two types of on-on-on switches:
http://cdn.seymourduncan.com/blog/wp-content/uploads/Switches2_Diag_4.gif
According to the picture from the link your layout uses type 2. I had type 1, so I had to do the opposite soldering (i.e. connect 1 to Mode SW 4, 2 to Clip SW 2, 5 to Mode SW 2 and 6 to Mode SW 3).
I hope this information is helpful to you and everyone else who wants to build the Fulldrive.
Hi Euan,
Certainly! I use ceramics for the pico farad values myself. Film caps in pF can be hard to find regardless of where you live.
Hey, can I use a ceramic cap for the 10pF and 51pF caps? I know its best to use film caps where possible, but I struggle to get them this small in New Zealand.
Thanks for the work in creating these vero designs, in NZ its harder to get printed circuit boards made for a decent price, so to be able to do it on vero is awesome!! Thanks
Should work as long as the IC and transistors are rated for that much voltage and you use +25v caps.
Can I run this at 18 volts like other Fulltone pedals?
Blake, I’m sorry, but no I haven’t got the schematic.
do you happen to have the schematic for the FD2 Mosfet?
From what I can determine (have a look at the schematic on madbeans DLS project) I believe the purpose is for the center position is to disconnect both sections (i.e. connect the unused lugs; 1-2 and 5-6), but I’ve done only 10 minutes of research on this so don’t quote me on this.
I ask the questions on a other way. Whats the aim of the middle Position of the main switch. That 1-2 and 5-6 make no connection or that the Clipswitch make connection with Modeswitch 4 and the Modeswitch 2 with 3 on the platine?
Not sure which one really, but you can get away with either with at most having to mirror the wiring.
Is the DPDT on on on a type 1 or type 2 DPDT? http://4.bp.blogspot.com/-bGITSdyZOXk/TZm5QatV9gI/AAAAAAAAAV8/XdPT5jyQ7Sg/s1600/dpdtsw.png
Did one of these recently modded to Bass Drive with the addition of a Buff’n’Blend to allow clean bass to be mixed. 5 pots, 2 switches and 2 boards is a lot to get in an Eddystone BB but it all fitted and there was even room for a battery.
I’m guessing: Remove R7, “boost” switch and “boost” pot. Wire “drive 2, 3” directly to the “boost 2, 3” label. That might work, no warranties.
Hello, If I wanted to do this but completely leave out the boost section and just do it as a single drive what would I do?
Thanks
Hi, amapola. Good question. The easiest solution would be to find the correct schematic, but I’m guessing that’s hard to come by since you’re asking this question to begin with.
I haven’t really got any experience with bass effects to be honest, but from what I gather you need to ensure the size of the coupling caps are adequate. That would be C1, C3, C10, C11 and C12. These may have to be swapped out for larger ones (in value). In addition I’d guess you have to modify the tone control a bit to make it more useful with lower frequencies. As to what I can’t really tell you off the top of my head.
I’d recommend you try to breadboard the circuit and do a little trial and error to find the parts that suit your taste.
hi harald
i want to turn this vero layout fulldrive 2 in fulltone bassdrive. After you, which caps do i have to change ?
THANX FOR NEWS
thanks so much…
love this pedal….
thank you
As you said, try: C3 (+) towards Q1, i.e. left. C10 (+) at IC1 pin 7, i.e. down.
Hi Harald,
Thanks for that vero, I am going to try it very soon. I have one question for you: If I want to sub C3 and C10 with two electrolyte caps, the positive side of C3 is on the left and C10 at bottom?
Thanks again.
Ben